Friday, July 9, 2021

Azure Firewall with Static Outbound Public IP – Azure NAT Gateway

12 min to read.

Abstract

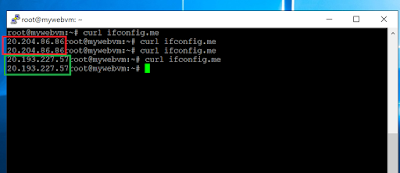
Below conversation may come as a surprise for some organizations when they onboard on Azure Firewall – [Click on image to get better view]


Azure Firewall randomly selects attached public IPs for outbound SNAT connections.

Many times for outbound connections, organizations prefer to use static public IP for Outbound SNAT connections. This helps a lot in whitelisting at organization customer’s / partner’s end. As of today Azure Firewall do not offer this capability.

This article talks about; how can you make sure that traffic leaving Azure Firewall uses a static public outbound IP addresses or range of static public IP addresses.

The solution proposed below is being used in many large enterprises today successfully, for providing static outbound IP to Azure Firewall.

Let’s go!

Understanding inbound and outbound connections

In below diagram I have one Azure VNET in which I have deployed one windows server and Azure Firewall instance in dedicated subnet. Let us quickly understand what is inbound and outbound traffic flow.

The Azure VM do not have any public IP assigned to it. If I host a sample application on top of this Azure VM then public facing endpoint is public IP of Azure Firewall.

Inbound means traffic originating from internet and reaching to Azure VM through DNAT operation of Azure Firewall. Refer below diagram – [click on image to get better view].


Note – Remember, for the inbound connection there will be response sent. This is response traffic and not outbound traffic.

Outbound means traffic generated within Azure environment and going out to internet. Refer below diagram – [click on image to get better view].


Problem Statement

No Outbound Static IP

Now that inbound and outbound traffic is clear; in above diagram Partner DC may ask for public IP of your Azure environment to whitelist in their firewalls. So in that case we will need static public IP/ range of public Ips assigned to firewall.

This way outbound traffic generated with Azure [in our case inside Azure VM] to partner DC will be SNAT to static public IP.

However as stated above; Azure Firewall randomly picks up any public IP assigned to it for outbound SNAT. This proposes challenges to customers.

Limited SNAT ports

Another important point to consider is about SNAT ports. When traffic goes out from firewall, a port will be used to send the traffic outbound. These number of ports are always per public IP assigned to Azure Firewall. Azure Firewall offers 2048 ports per public IP assigned. This might be a lower number based on application nature.

Whenever one outbound connection is made, one port will used from Azure Firewall. The engaged port is not released until connection operation is completed. At the same time if Azure Firewall needs to make another outbound connection then another port will be used.

This means, at any given point, one instance of Azure Firewall service with one public IP attached, can make maximum 2048 outbound concurrent connections.

Azure Firewall support max 250 public Ips. So total SNAT ports available on Azure Firewall – 250*2048 = 512,000.

However, 250 public IP is still a big number. You do not attach so many public Ips to Firewall instance out of the blue. You generally attach per application. Bringing 250 applications behind single Azure Firewall instance may not be possible right away when you start Azure journey.

At the same time; your single application running behind Azure firewall may easily need concurrent a million outbound connections. Example, WebSocket based chat application, mobile app communication using websockets.

Therefore we need a way by which we can scale SNAT ports as well for outbound connections passing through Azure Firewall.

Verifying Random IP Behavior

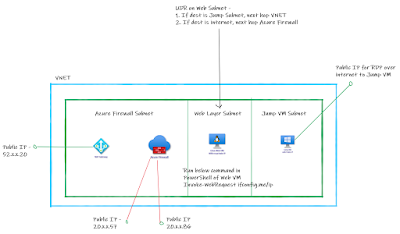
I have below construct in my Azure Subscription. [Click on the image to get better view] –

1.      Created VNET with 3 subnets – Firewall Subnet, Web VM subnet, Jump VM Subnet

2.      Attached two public Ips to Azure Firewall.

3.      Created Web VM in Web Layer and did NOT attach any public IP.

4.      Create Route Table with below routes and attached to web layer subnet

a.      If destination is Jump Layer subnet – next hop VNET

b.      If destination is internet [0.0.0.0/0] – next hop AzureFirewall IP.

5.      Created Jump VM WITH Public IP; just to take RDP to web VM over its private ip.


Here are the screenshots of Azure Firewall IP configurations and UDR on Web Layer Subnet. [click to get better view].


I am going to add ifconfig.me domain inside Azure firewall to allow the outbound traffic. Therefore we need to add DNS settings on Azure Firewall. Below is the screenshot to add the same – [click to get better view].


We will be using ifconfig.me URL to get the IP. Therefore allow the same in Azure Firewall as shown below using application rules. [click to get better view].

Now when I run command Curl ifconfig.me/ip from putty of Web VM; we see the firewall IP as an output. This means because of UDR attached to web layer, internet traffic initiated from web vm is passing through Azure Firewall. Azure Firewall then sending to internet by SNAT [Source NAT] to its own one of the public IP.

From below screenshot you can clearly see that any random IP out of two public Ips attached 
to Azure Firewall, is being used while outbound traffic is SNAT from Azure Firewall. 
[click to get better view]. 


From above screenshot it is visible that out of the two public Ips random IP is being chosen for outbound access.

Here is the Deal…NAT Gateway!

Microsoft Azure releases Virtual Network NAT service that simplifies the outbound-only internet connectivity for virtual networks. When configured on a subnet, all outbound connectivity uses your specified static public IP addresses.

Many times this service is also referred to as NAT Gateway.

Per public IP attached to NAT gateway we get 64,000 outbound SNAT ports. One NAT gateway can have 16 public IP addresses attached.

So total outbound SNAT ports available with a NAT gateway = 16 * 64,000 = 1,024,000.

So NAT Gateway is our solution to get Static Public IP for outbound traffic flowing through Azure Firewall.

Create NAT gateway and associate to subnet of Azure Firewall. Assign a public IP to NAT gateway. So as shown in the below diagram, even if the Azure Firewall has 2 public IP addresses; traffic originating from Web VM always take NAT Gateway associated public IP as outbound IP. [click to get better view].


Create NAT GW and associate to AzureFirewallSubnet using below sample powershell commands. Make sure you replace Resource groups name, VNET Name and location as appropriate.

# Create public IP addresses

New-AzPublicIpAddress -Name public-ip-1 -ResourceGroupName AzFwStaticIPRG -Sku Standard -AllocationMethod Static -Location 'Central India'

# Create NAT gateway

$PublicIPAddress1 = Get-AzPublicIpAddress -Name public-ip-1 -ResourceGroupName AzFwStaticIPRG

New-AzNatGateway -Name firewall-nat -ResourceGroupName AzFwStaticIPRG -PublicIpAddress $PublicIPAddress1 -Location 'Central India' -Sku Standard

# Associate NAT gateway to subnet

$virtualNetwork = Get-AzVirtualNetwork -Name MyVNET -ResourceGroupName AzFwStaticIPRG

$natGateway = Get-AzNatGateway -Name firewall-nat -ResourceGroupName AzFwStaticIPRG

$firewallSubnet = $virtualNetwork.subnets | Where-Object -Property Name -eq AzureFirewallSubnet

$firewallSubnet.NatGateway = $natGateway

$virtualNetwork | Set-AzVirtualNetwork

 The Azure NAT Gateway I created has public IP address 52.x.x.20 and is visible on Azure portal as below – [click to get better view].


Similarly it is associated to AzureFirewallSubnet as shown below – [click to get better view].


Verifying Static Outbound IP Address

Logged in to webvm using SSH and ran curl ifconfig.me command. We can see that it is showing Nat Gateway IP. Using NAT Gateway, for outbound traffic passing through Azure Firewall NEVER selected random IP from Azure firewall. [click to get better view].


Conclusion

Hope this article helped to overcome behavior of random public IP selection of Azure Firewall for outbound traffic. NAT Gateway is fully managed service and helps to configure static public outbound IP for outbound traffic passing through Azure Firewall.

Happy Static IPs!

A humble request!

Internet is creating a lot of digital garbage. If you feel this a quality blog and someone will definitely get benefited, don't hesitate to hit share button present below. Your one share will save many precious hours of a developer. Thank you.

Next Related Posts

Proven Azure Architecture Patterns using PaloAlto NGFW and F5 DDoS and WAF

4 VNETs and transitive Routing using Azure firewall

Azure Virtual Machines – real world frequently asked questions – not easily answered.

Azure VM disk encryption, what should be my approach!

Bypass onpremises firewall to RDP or SSH into Azure VM 

Thursday, May 20, 2021

PaloAlto NGFW, F5 WAF and DDoS - Proven Azure Architecture Patterns

14 min to read.

Abstract

I have been part of many Azure Landing Zone implementations in last 1.5 years. Many organizations are already invested on below security devices –

1.      F5 WAF – Web Application Firewall

2.      F5 DDoS – Distributed Denial of Service

3.      PaloAlto NGFW – Next-Generation Firewalls

Enterprises have inclination to use same devices on Azure as well. Not only because they are invested in licenses costs but also on skillset cost. There are dedicated [paid] teams managing these devices and logging, monitoring, SOC, incident management, dashboards everything is already streamlined for them.

This article talks about Azure Architecture patterns I have seen across many organizations Azure Deployment using F5 WAF, DDoS and PaloAlto NGFW.

Note - Below I am considering incoming traffic from internet and outgoing to internet. I am not talking about Azure-OnPremises connectivity scenario in below architecture patterns.

Also recommendations as per my experience; deploy the security devices in dedicated VNET and configure all applications in separate VNET [Hub-Spoke!].

Azure Architecture Pattern 1

Refer to first pattern on deploying F5, PaloAlto devices in combination on Azure – [Click on image to get better view].


Pattern 1 Description

1.      The traffic from internet lands on public IP attached to External Standard Load Balancer [Layer 4] of Azure in front of F5 DDoS VMs.

2.      On External Azure Standard load balancer you can configure inbound public Ips. These public Ips can be added as per number of applications sitting behind your internet DMZ.

3.      DDoS Azure VMs are configured as Active-Passive or Active-Standby. At any given point only single Azure VM of F5 DDoS is serving the incoming requests from internet.

4.      PaloAlto NGFW VM-Series Azure VMs are configured as active-passive. It has an Azure Standard internal load balancer in front of it for load balancing and HA achievement. For monitoring purpose it is required to know incoming source IP at firewall; therefore we did not perform SNAT on DDoS. However at PaloAlto VM-Series firewall on Azure we can perform SNAT [if need be].

5.      F5 WAF VMs are present behind the PaloAlto NGFW. F5 WAF is also configured in Active-Active configuration. It has an internal load balancer in front of it for load balancing and HA achievement.

6.      F5 WAF machines do not have any public IP assigned.

Where do we perform SSL Offload?

To inspect incoming traffic; SSL offload is mandatory. Without SSL Offload packet can’t be inspected/ verified if it is valid traffic or malicious traffic. Therefore in above Azure Architecture pattern we should perform SSL Offload on F5 DDoS VMs. Post which you can inspect traffic on PaloAlto NGFW and F5 WAF.

What if I want to achieve end to end SSL on incoming traffic?

Perform SSL Offload on F5 DDoS Azure VMs. Then let traffic be inspected on F5 DDoS, PaloAlto NGFW and F5 WAF Azure VMs. On F5 WAF itself post inspection you re-configure the leaving traffic with new SSL certificate. So after F5 WAF when traffic goes to application VMs then it will be accessed over internal private IP communication; over HTTPS. This is end to end SSL.

How my outbound traffic “generated within my Azure environment” will flow?

In above diagram we have configured/ assigned public IP directly to one of the Azure PaloAlto VM. So traffic initiated from Application VMs directly goes to Azure PaloAlto VM and then it goes out to internet. In this traffic flow, F5 WAF and F5 DDoS Azure VMs do not come in to picture.

Make sure you attach separate public IP to one of NIC of each PaloAlto Azure VMs.

In case you want to ask 3rd party company to whitelist your outgoing IP in their firewall; then both Ips of firewall will be required to whitelisted.

Note - If you fear of exhausting SNAT ports for Azure PaloAlto VM then you can also configure Azure NAT gateway in same subnet of PaloAlto NGFW external/ internet interface and use it for all outbound traffic. I have not tried this but should be pretty straight forward.

Azure Architecture Pattern 2

Many times customers prefer to use separate public Ips for inbound and outbound traffic. Separate outbound traffic public IP helps in whitelisting at their customers end. Example, WoodGrove org has api which will be called from Azure environment of Contoso company. So WoodGroove will ask Contoso to provide public IP range from which the api will be called. In this case Contoso will share the public IP to WoodGroove, specifically attached for outbound traffic “generated within Azure”.

In above pattern #1, we have public IP attached at the F5 DDoS Azure LB and also to the PaloAlto NGFW VM-Series. Sometimes customer do not want any public to be attached other than entry point. This can be addressed using below pattern. [Click on image to get better view].


Pattern 2 Description

1.      The traffic from internet lands on public IP attached to External Azure Standard Load Balancer [Layer 4] of Azure in front of F5 DDoS Azure VMs.

2.      On External Azure Standard load balancer you can configure inbound public Ips. These public Ips can be added as per number of applications sitting behind your internet DMZ.

3.      DDoS Azure VMs are configured as Active-Passive or Active-Standby. At any given point only single Azure VM of F5 DDoS is serving the incoming requests from internet.

4.      PaloAlto NGFW Azure VMs are configured as active-passive. It has an Azure Standard internal load balancer in front of it for load balancing and HA achievement.

5.      F5 WAF VMs are present behind the PaloAlto NGFW. F5 WAF is also configured in Active-Active / Active-passive configuration. It has an internal load balancer in front of it for load balancing and HA achievement.

6.      F5 WAF and PaloAlto NGFW VMs do not have any public IP assigned.

7.      Standard Azure load balancer attached in front of F5 DDoS also has outbound rules configured. To know more refer - https://docs.microsoft.com/en-us/azure/load-balancer/outbound-rules#scale.

8.      SSL Offload still happens at F5 DDoS Azure VMs.

9.      There is no SNAT performed for incoming traffic at DDoS therefore source IP is visible in PaloAlto NGFW Azure VMs.


How my outbound traffic “generated within my Azure environment” will flow?

In above diagram we have configured/ assigned public IP to External Azure Standard Load Balancer; present in front of F5 DDoS Azure VMs. Therefore we will need to configure UDR [Azure Route Tables] to make outbound traffic flow in below sequence –

App VM -> F5 WAF -> PaloAlto NGFW -> F5 DDoS -> Azure Standard LB -> Internet

In this case, outbound traffic flowing through F5 WAF and DDoS do not add any value. However as customer requirement is not to allow any public IP other than entry point; we will have to make traffic flow through each of the device. Here F5 WAF and DDoS will act only as pass through for traffic and adding extra hops.

Azure Architecture Pattern 3

When I implemented Azure Landing Zones at financial organizations many of them asked a variation in above patterns with Proxy deployment on Azure for Outbound traffic. So for outbound traffic below can be another architecture pattern where traffic flows as - >

App VMs-> Proxy VMs -> PaloAlto NGFW VMs -> Internet.

Same approach can also be used for pattern #2 above. Below is architecture for Pattern # 1 with Proxy – [Click on image to get better view].


Azure Architecture Pattern 4

While we can have entry point on Azure Internet DMZ Zone through F5 DDoS BIG IP on Azure VMs; we can achieve the high availability WITHOUT USING Azure Standard Load Balancer as well.

Refer to below diagram for the same - [Click on image to get better view].


In above diagram assuming we want to retain Source IP to Firewall level; we can configure DDoS F5 Azure VMs in Active-Passive.

In the diagram, for F5, in the event of a failover, the IP configuration is deleted from active device and recreated on that standby device’s network interface. So your public IP [virtual IP] on which traffic lands remain same irrespective of which VM is serving the requests.

This failover is API call based failover and well explained here - Azure(f5.com).

Same API based failover can also be achieved for F5 WAF device. Also you can keep adding secondary public IP addresses per application being onboarded behind this DMZ zone.

Azure Architecture Pattern 5

I have many organization using PaloAlto Azure VMs Firewall for outbound and inbound combined had to use bigger size VMs. There is another deployment pattern I have seen where separate Azure PaloAlto Firewalls are used for inbound and outbound.

In this pattern we will need to perform mandatory SNAT at F5 WAF level to allow return traffic reach to correct destination of F5 WAF and outbound traffic generated within app layer to reach to outbound PaloAlto Azure VM. Refer to below diagram for details - [Click on image to get better view].


Here we are having two public Ips attached to one of the NIC of each of outbound PaloAlto NGFW. So that based on current active VM the outbound traffic flow outside to internet.

Remember you will need UDR configured in app layer in such a way that traffic destined to internet will flow to PaloAlto NGFW Azure VMs and rest of the traffic should flow to F5 WAF.

Is there a way to run F5 BIG-IP DDoS on Azure on entry point in Active-Active with No SNAT?

If you want to preserve incoming source IP till firewall/ app layer then SNAT should not be used. If we plan to deploy F5 DDoS in Active-Active then SNAT is required. Otherwise return traffic does not understand which was VM devices to be used for return/ response traffic. In this case source IP of incoming traffic will not be visible to firewall. In such case many customers take below approach –

1.      Configure SSL Offload on F5 DDoS

2.      Configure F5 DDoS in Active-Active with SNAT.

3.      Add incoming Source IP in X-Forwarded-For [XFF] header.

This is fine if you firewall devices are able to block incoming malicious IP present in XFF. If not, then Active-Passive will make more sense.

Should I always have F5 DDoS on front irrespective of order of devices?

DDoS is for protection of traffic coming from internet. So for internet facing applications, you should always have DDoS in front of everything.

I see PaloAlto NGFW VM-Series on Azure is mentioned as Active-Standby / Active-Passive only? Can it work in Active-Active mode?

As of today PaloAlto VM-Series firewall on Azure can not work in Active-Active mode. Refer to the document for more information - VM-Series in High Availability (paloaltonetworks.com)

Do we need to perform SNAT on PaloAlto VM-Series Firewall?

If you don’t want to retain source IP forwarded from DDoS devices beyond PaloAlto NGFW Azure VMs then you can certainly perform SNAT on PaloAlto VM-Series Firewall Azure VMs. IF you want to retain source incoming IP till application layer then “Do not” perform SNAT on PaloAlto firewall device.

How to preserve Incoming Source IP of internet till Azure application layer VMs?

Many organizations require incoming source IP to be preserved till application layer/ firewall layer for monitoring/ business requirement/ logging/ audit purpose. If this is the case then you will need to configure the F5 DDoS Azure VMs in Active-Passive or Active-Standby mode.

This way Source IP of internet is not NATted on F5 DDoS Azure VMs and it is visible in PaloAlto NGFW layer. If SNAT is configured on DDoS then PaloAlto NGFW will never see real incoming source IP from internet.

Similarly to preserve the source IP beyond PaloAlto Azure firewall; you will need to avoid SNAT on PaloAlto Azure VM-Series and F5 WAF devices.

Refer to Pattern 5 which stated how can you have incoming source IP taken to App layer in XFF header through F5 WAF device. Or you can simply avoid SNAT n F5 WAF Azure VMs also and you will get source IP as internet IP in application layer..

Conclusion

There can be many combinations of the security devices of F5 and PaloAlto on Azure. The above mentioned architecture patterns I have seen at most of the places on Azure. Hope this article helped to design combination of F5, PaloAlto on Azure.

If you have any recommendations to make article better, reach out to me. I will be more than happy to update the article.

Happy NVAs on Azure!

A humble request!

Internet is creating a lot of digital garbage. If you feel this a quality blog and someone will definitely get benefited, don't hesitate to hit share button present below. Your one share will save many precious hours of a developer. Thank you.


Next Related Posts

Restrict Azure Firewall access from Owner and Contributors of Azure Portal

Azure Virtual Machines – real world frequently asked questions – not easily answered.

Acomplex design – Site to Site VPN, VNET Peering and 4 VNETs – how to solve using Azure Firewall?

Azure VM disk encryption, what should be my approach!

Bypass onpremises firewall to RDP or SSH into Azure VM

Sunday, April 25, 2021

How to Restrict Azure Firewall Access from Contributor, Owner Role?

 7 min to read.

Abstract

When I look at Azure Built In Role Documentation I always feel this is really big list of built in roles and hardly any Organization will require to create new Azure custom role.

However when you work with Azure Customers, your faith and beliefs are bound to fail. And if your customer is Bank, your concepts of Security will fail.

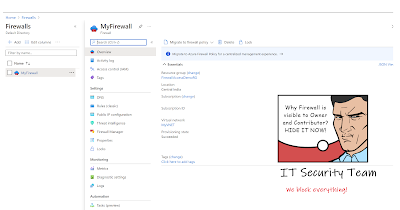
So my customer started big on Azure Firewall. It was maintained by their network administrators team. One fine day network admin discovered that the Azure Firewall is visible to all users with Contributor and Owner access.

Obviously the demand came that Owner/ Contributor should have full access EXCEPT Azure Firewall.

Damn Zero Trust!

Anyways, How to hide/ restrict Azure Firewall access from Azure Owner and Contributors? Read on…


Have you heard of Azure custom roles?

The solution is simple. We need Custom Owner and Contributor role that will have default access levels except for Azure Firewall.

Azure Built in Roles list is here - https://docs.microsoft.com/en-us/azure/role-based-access-control/built-in-roles.

If the Azure Built In Roles don’t meet the specific needs of your organization, you can create your own custom roles.

So we will need to build custom Owner and Contributor role that do not have access to Azure Firewall.

Always get Built in Role Definition first!

For simplicity I am going to build custom Contributor Role only. Same can be replicated for Owner Role too.

First let us grab the built in role definition of Contributor Role using Azure PowerShell.

If you do not have Azure PowerShell get it installed or use it from Azure Shell. I want to edit the role definition on my local laptop so I am using Azure PowerShell from my local machine.

First login to correct Azure Subscription and Azure AD. I have seen major bomb blasts due to wrong selection of Subscription and Azure AD Tenant.

Connect-AzAccount -Subscription YourSubscriptionID  -Tenant YourAzureADTenantName-Like-Something.onmicrosoft.com

Get Contributor Role definition in JSON format with below command –

Get-AzRoleDefinition -Name "Contributor" | ConvertTo-Json | Out-File "YourPath\Contributor.Json"


Make sure that correct Path is selected as per your choice in above command. The Contributor role definition JSON will be created at specified location and it looks similar to below screenshot. Open JSON in Visual Studio Code. [click to get better view].


Modify the Contributor Role to Restrict Azure Firewall access!

I copy pasted above Contributor Role JSON to another document in VS Code changed the name of file..

The name of the role I changed to “Contoso-Contributor.json”.

Now take quick steps as mentioned below –

1.      Remove the Id filed completely. When you create role in Azure PowerShell; ID filed automatically gets created for you.

2.      As this is going to be customer Azure Role; change “IsCustom” property to True.

3.      Change the description that suits to your needs. I changed it to – Contoso Contributor Grants full access to manage all resources, but does not allow you to assign roles in Azure RBAC, manage assignments in Azure Blueprints, or share image galleries. However  users with this role can't access Azure Firewall.

4.      To remove the firewall access we need to add below line in NotActions segment of JSON as below – Microsoft.Network/azurefirewalls/*"

When we added * above, this means all types of actions are removed / restricted for Azure Firewall Resources. Make sure that you add “comma” on second last line.

5.      Make sure you add the desired subscription at the bottom in “AssignableScopes” property. Unless subscription Id added the role will not be created. The format of subscription has to be as follows -

Refer to screenshot below – [click to get better view].


Create the Role Definition in Azure Subscription

Now run below PowerShell command to get the role created. Make sure you use the Path of your choice where Contoso contributor json definition is present.

New-AzRoleDefinition -InputFile "YourPath\Contoso-Contributor-NoFirewallAccess.json"


The output of the command will be shown as below – [click to get better view]


Assign the role to user

I have created a user named as Contoso User in My Azure AD as shown below – [Click to get better view]


Then go to Azure Subscription -> Subscription -> Select Subscription [which is used in AssignableScope] -> Access Control -> Add -> Role Assignment. Selected Contoso User and assigned custom contributor role – [click to get better view]


Verify Azure Firewall Access

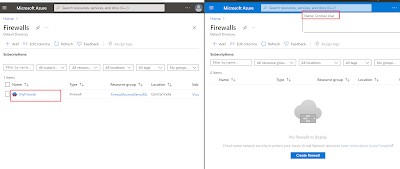
So, I selected two users – One with Contributor role and other with Contoso-Contributor Role. When click on Azure Firewall; I can clearly see that even If the Contoso User has all the access same as normal Contributor; the Azure Firewall Resource is not visible – [click to get better view].


Conclusion

Hope this article helped to Custom Contributor role to restrict / hide Azure Firewall.

Happy access control!!

A humble request!

Internet is creating a lot of digital garbage. If you feel this a quality blog and someone will definitely get benefited, don't hesitate to hit share button present below. Your one share will save many precious hours of a developer. Thank you.

Next Related Posts

4VNETs and transitive Routing using Azure firewall

Azure Virtual Machines – real world frequently asked questions – not easily answered.

Azure Migration frequently asked questions, not easily answered!

Azure VM disk encryption, what should be my approach!

Bypass onpremises firewall to RDP or SSH into Azure VM