Showing posts with label Azure IaaS. Show all posts

Friday, July 9, 2021

Azure Firewall with Static Outbound Public IP – Azure NAT Gateway

12 min to read.

Abstract

Below conversation may come as a surprise for some organizations when they onboard on Azure Firewall – [Click on image to get better view]


Azure Firewall randomly selects attached public IPs for outbound SNAT connections.

Many times for outbound connections, organizations prefer to use static public IP for Outbound SNAT connections. This helps a lot in whitelisting at organization customer’s / partner’s end. As of today Azure Firewall do not offer this capability.

This article talks about; how can you make sure that traffic leaving Azure Firewall uses a static public outbound IP addresses or range of static public IP addresses.

The solution proposed below is being used in many large enterprises today successfully, for providing static outbound IP to Azure Firewall.

Let’s go!

Understanding inbound and outbound connections

In below diagram I have one Azure VNET in which I have deployed one windows server and Azure Firewall instance in dedicated subnet. Let us quickly understand what is inbound and outbound traffic flow.

The Azure VM do not have any public IP assigned to it. If I host a sample application on top of this Azure VM then public facing endpoint is public IP of Azure Firewall.

Inbound means traffic originating from internet and reaching to Azure VM through DNAT operation of Azure Firewall. Refer below diagram – [click on image to get better view].


Note – Remember, for the inbound connection there will be response sent. This is response traffic and not outbound traffic.

Outbound means traffic generated within Azure environment and going out to internet. Refer below diagram – [click on image to get better view].


Problem Statement

No Outbound Static IP

Now that inbound and outbound traffic is clear; in above diagram Partner DC may ask for public IP of your Azure environment to whitelist in their firewalls. So in that case we will need static public IP/ range of public Ips assigned to firewall.

This way outbound traffic generated with Azure [in our case inside Azure VM] to partner DC will be SNAT to static public IP.

However as stated above; Azure Firewall randomly picks up any public IP assigned to it for outbound SNAT. This proposes challenges to customers.

Limited SNAT ports

Another important point to consider is about SNAT ports. When traffic goes out from firewall, a port will be used to send the traffic outbound. These number of ports are always per public IP assigned to Azure Firewall. Azure Firewall offers 2048 ports per public IP assigned. This might be a lower number based on application nature.

Whenever one outbound connection is made, one port will used from Azure Firewall. The engaged port is not released until connection operation is completed. At the same time if Azure Firewall needs to make another outbound connection then another port will be used.

This means, at any given point, one instance of Azure Firewall service with one public IP attached, can make maximum 2048 outbound concurrent connections.

Azure Firewall support max 250 public Ips. So total SNAT ports available on Azure Firewall – 250*2048 = 512,000.

However, 250 public IP is still a big number. You do not attach so many public Ips to Firewall instance out of the blue. You generally attach per application. Bringing 250 applications behind single Azure Firewall instance may not be possible right away when you start Azure journey.

At the same time; your single application running behind Azure firewall may easily need concurrent a million outbound connections. Example, WebSocket based chat application, mobile app communication using websockets.

Therefore we need a way by which we can scale SNAT ports as well for outbound connections passing through Azure Firewall.

Verifying Random IP Behavior

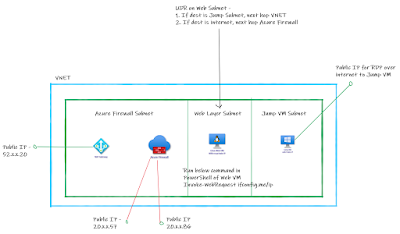
I have below construct in my Azure Subscription. [Click on the image to get better view] –

1.      Created VNET with 3 subnets – Firewall Subnet, Web VM subnet, Jump VM Subnet

2.      Attached two public Ips to Azure Firewall.

3.      Created Web VM in Web Layer and did NOT attach any public IP.

4.      Create Route Table with below routes and attached to web layer subnet

a.      If destination is Jump Layer subnet – next hop VNET

b.      If destination is internet [0.0.0.0/0] – next hop AzureFirewall IP.

5.      Created Jump VM WITH Public IP; just to take RDP to web VM over its private ip.


Here are the screenshots of Azure Firewall IP configurations and UDR on Web Layer Subnet. [click to get better view].


I am going to add ifconfig.me domain inside Azure firewall to allow the outbound traffic. Therefore we need to add DNS settings on Azure Firewall. Below is the screenshot to add the same – [click to get better view].


We will be using ifconfig.me URL to get the IP. Therefore allow the same in Azure Firewall as shown below using application rules. [click to get better view].

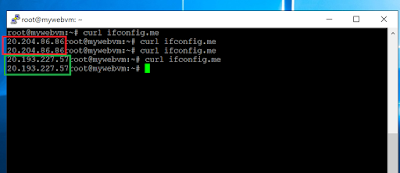
Now when I run command Curl ifconfig.me/ip from putty of Web VM; we see the firewall IP as an output. This means because of UDR attached to web layer, internet traffic initiated from web vm is passing through Azure Firewall. Azure Firewall then sending to internet by SNAT [Source NAT] to its own one of the public IP.

From below screenshot you can clearly see that any random IP out of two public Ips attached 
to Azure Firewall, is being used while outbound traffic is SNAT from Azure Firewall. 
[click to get better view]. 


From above screenshot it is visible that out of the two public Ips random IP is being chosen for outbound access.

Here is the Deal…NAT Gateway!

Microsoft Azure releases Virtual Network NAT service that simplifies the outbound-only internet connectivity for virtual networks. When configured on a subnet, all outbound connectivity uses your specified static public IP addresses.

Many times this service is also referred to as NAT Gateway.

Per public IP attached to NAT gateway we get 64,000 outbound SNAT ports. One NAT gateway can have 16 public IP addresses attached.

So total outbound SNAT ports available with a NAT gateway = 16 * 64,000 = 1,024,000.

So NAT Gateway is our solution to get Static Public IP for outbound traffic flowing through Azure Firewall.

Create NAT gateway and associate to subnet of Azure Firewall. Assign a public IP to NAT gateway. So as shown in the below diagram, even if the Azure Firewall has 2 public IP addresses; traffic originating from Web VM always take NAT Gateway associated public IP as outbound IP. [click to get better view].


Create NAT GW and associate to AzureFirewallSubnet using below sample powershell commands. Make sure you replace Resource groups name, VNET Name and location as appropriate.

# Create public IP addresses

New-AzPublicIpAddress -Name public-ip-1 -ResourceGroupName AzFwStaticIPRG -Sku Standard -AllocationMethod Static -Location 'Central India'

# Create NAT gateway

$PublicIPAddress1 = Get-AzPublicIpAddress -Name public-ip-1 -ResourceGroupName AzFwStaticIPRG

New-AzNatGateway -Name firewall-nat -ResourceGroupName AzFwStaticIPRG -PublicIpAddress $PublicIPAddress1 -Location 'Central India' -Sku Standard

# Associate NAT gateway to subnet

$virtualNetwork = Get-AzVirtualNetwork -Name MyVNET -ResourceGroupName AzFwStaticIPRG

$natGateway = Get-AzNatGateway -Name firewall-nat -ResourceGroupName AzFwStaticIPRG

$firewallSubnet = $virtualNetwork.subnets | Where-Object -Property Name -eq AzureFirewallSubnet

$firewallSubnet.NatGateway = $natGateway

$virtualNetwork | Set-AzVirtualNetwork

 The Azure NAT Gateway I created has public IP address 52.x.x.20 and is visible on Azure portal as below – [click to get better view].


Similarly it is associated to AzureFirewallSubnet as shown below – [click to get better view].


Verifying Static Outbound IP Address

Logged in to webvm using SSH and ran curl ifconfig.me command. We can see that it is showing Nat Gateway IP. Using NAT Gateway, for outbound traffic passing through Azure Firewall NEVER selected random IP from Azure firewall. [click to get better view].


Conclusion

Hope this article helped to overcome behavior of random public IP selection of Azure Firewall for outbound traffic. NAT Gateway is fully managed service and helps to configure static public outbound IP for outbound traffic passing through Azure Firewall.

Happy Static IPs!

A humble request!

Internet is creating a lot of digital garbage. If you feel this a quality blog and someone will definitely get benefited, don't hesitate to hit share button present below. Your one share will save many precious hours of a developer. Thank you.

Next Related Posts

Proven Azure Architecture Patterns using PaloAlto NGFW and F5 DDoS and WAF

4 VNETs and transitive Routing using Azure firewall

Azure Virtual Machines – real world frequently asked questions – not easily answered.

Azure VM disk encryption, what should be my approach!

Bypass onpremises firewall to RDP or SSH into Azure VM 

Monday, March 9, 2020

Bypassing on premises firewall to RDP or SSH into Azure VM

12 min to read.

Abstract

Believe it or not! On-premises firewalls port opening process is proving to be number one blocker for Azure adoption, till the time Site to Site VPN or Azure Express Route is setup.

Problem is not with changing the firewall rules to access Azure VM either by RDP or SSH; It is the “process” setup by an Enterprises to allow an outbound traffic from their on premises network; to Azure or internet in general.

I am not saying security teams working for on premises environment security is bad; it is their job to keep things secure and hence they will always hesitate/ seek approval/ seek clarifications to open 3389 or 22 port for outbound traffic from their network.

In this blog post I will illustrate a way by which you can access Azure VM either by RDP or SSH without asking your internal network/ security team to open any ports.

Let’s go!

Problem Statement

Refer to below diagram – [To get good view of the diagram, click on it]


       1.      As you can see in the diagram above; your laptop is sitting in your organizations network which is controlled environment with Firewall and proxy devices.
2.      You have azure VM with public IP x.x.x.x as shown in the diagram.
3.      To make RDP/ SSH into Azure VM you need to use standard ports like 3389 for RDP and 22 for SSH.
4.      There is no Site to Site or Express Route present between your on premises network and Azure environment.
5.     Your organizations on premises firewall device blocks any outbound/ outgoing internet traffic with port 3389/22.
6.      Hence your RDP/ SSH to Azure VM from your laptop fails.

So you may say that let me talk to my network/ security/ firewall team and see if they can open 3389/ 22 port outbound for my laptop IP?

Well you can do that but based on my experience I have seen, it takes weeks to get 3389/ 22 opened for internet or even for particular IP. Also organizations have a process set for making port opening and rule modification in firewall. As security teams and your firewall operations always go through stringent audit and compliance process; it will always be a big battle for you.

If you are financial organization then opening up 3389/ 22 over internet in on premises is never happening!

The most secured solution is to use either Site to Site VPN or Express route to connect to Azure VMs. However configuration of these also takes time.

So what is the solution to quickly get started with RDP/ SSH to Azure VM without opening on premises firewall rules?

Solution architecture – Have Azure VM behind Azure Load Balancer


Although all on premises firewall/ proxy servers will block 3389/ 22 ports; they will always have 443 port 
outbound openFor example from my laptop in above diagram if I plan to access https://google.com then this will be accessed over 443 port only as most of the trusted site works on https and default port for https is 443. 

So if I take RDP/ SSH from my laptop over 443 port instead of 3389/ 22 port then traffic originated from my laptop should cross on premises firewall and reach out side.

The question is how do I allow RDP/ SSH over 443? Because default port of RDP is 3389 and SSH is 22 and it 
can’t be changed. This is where I need “Inbound Network Address Translation [Inbound NAT]”.

Means my traffic should reach to Azure VM over 443 but the 443 port needs to be translated/ changed to 3389 or 22. However Azure VM can’t to inbound NAT and this is where we need Azure Load Balancer.

Azure load balancer is an awesome PaaS service. It takes care of inbuilt HA for you. It comes in 2 flavors –
       1.      Basic - Free
2.      Standard – Cost is associated with it.

For our case we can use Standard or Basic. I am poor guy and always love to avoid unnecessary spend. Because the contract of unnecessary spend I have given to my better half. So I will use Basic layer 4 Azure load balancer for this tutorial.

Refer to below diagram – [To get good view of the diagram, click on it]


       1.      From local laptop either for doing SSH or RDP use 443 as a port instead of standard ports for SSH and RDP.
2.      As the traffic to Azure VM is over 443; it is allowed in on premises firewall.
3.      The request for RDP/ SSH lands on Azure public Load balancer.
4.      The inbound NAT rules are processed, and incoming traffic translated to 3389/ 22 ports. Then forwarded to backend pool which is our VM we want to access.
5.      Similarly as session is established within on premises firewall; the return traffic flows back seamlessly to our laptop.

This way even if we don’t open any ports in on premises firewall we are able to reach to our VM on Azure.

Azure Public Load Balancer configuration

I am assuming you have Azure VM public IP, so follow the rest of the process.

First we will remove existing Public IP assigned to VM NIC; so that we can use same Public IP for Azure LB. As we are bringing Azure VM behind Azure LB; we don’t need Public IP for Azure VM.

Below screenshot depicts how can you disable the public IP for Azure VM NIC.


The IP that we assigned to Azure LB while creation will be configured automatically as “Frontend IP configuration” within Azure LB.

Create LB as shown. Attach same Public IP which we removed from Azure VM NIC. You can also create new to attach to LB but not required. Let us leverage existing public IP only.


Configure the existing VM as backend as shown below –


Then click on “Inbound NAT rules -> Add”. Provide the values as shown below –


In above NAT rule I am setting up custom port to 3389 as I am having windows VM to which I am doing RDP. If you have a linux VM, you should put custom port as 22.

After configuration of NAT rule in Azure LB if you see VM; you will still see same Public IP attached. Even if it shows public IP attached to Azure VM, it is actually attached to Azure Load Balancer. This can be confirmed with Public IP information blade from Azure portal as shown below –


RDP view

If you now try to make RDP using simply public IP as below it will not work. Because by default the system assumed the port number 3389.


Try the same RDP with 443 port and it should be successful as below –


In case this doesn’t work, make sure the NSG attached to VM is not blocking any traffic from Azure Load Balancer. By default rule in NSG allows the full traffic from load balancer to Azure VM and it’s weight is 65001 as shown below –


If you have added any other rule with lower weight value than 65001, then that rule might be blocking communication from load balancer to Azure VM. So kindly check NSG rules if this doesn’t work.

Benefits of this approach

Biggest benefit of this approach is you don’t have to inform anything to your security/ firewall teams. This works seamless. Biggest problem I see it as a security risk.

Bonus tip

Tip 1 –
Is this correct practice? Well not really. But if you want to get started immediately while your port opening in your organization is taking place or setup of Site to Site VPN, or Express Route is going to take time, then this is life saver.

Ultimately aim should be setting up Site to Site VNET or Express Route to access Azure resources from your on premises.

Tip 2 -
You can leverage azure offering called as Azure Bastion.

Conclusion

Hope this article helped you to get started on Azure VM quickly. Let me know your views in comments section below to improve and what are your thoughts on this approach.
Happy hacking!!

A humble request!

Internet is creating a lot of digital garbage. If you feel this a quality blog and someone will definitely get benefited, don't hesitate to hit share button present below. Your one share will save many precious hours of a developer. Thank you.


Next Related Posts


Monday, December 2, 2019

Azure Migrate – Frequently asked questions – not easily answered

12 min to read.

Abstract

Migration are not new to humans. Migrations are happening since early days of human history. Almost every person on planet earth have migrated one or more times in their life. In today's world I see people are migrating for their Love and Marriages. It is mostly boys who migrate for their love and mostly girls migrate after their marriage. Love and Marriage both are complex! 

When you say you have done Love Marriage - that is a deadly complex combination!

In technology world also, migrations are not new. Migrations of applications is fundamental work to achieve core motive of migration – Betterment.

Workloads / applications will be going through Azure migration. Questions related to Azure migrate are unique and I see many enterprises get stuck just because they are not able to find the right answer.
This blog post dedicated to all those “real world frequently asked Azure migrate questions - not easily answered”.

I am strong believer in Diversity and Inclusion therefore - This FAQ is suitable for people who knows Azure and who don’t know Azure yet!

Lets go!

Note – This is second blog in the popular series of Azure VM Real world frequently asked questions – not easily answered.

Azure Migrate

I just love the Azure Migrate engineering team. They are really awesome guys and most talented. In technology field, believe it or not “Migrations are always complex”. Azure Migrate engineering team is making cloud migration tasks so simple with their hard work and dedication. Really impressed!

Azure migrate is fantastic tool to cater to all of your migration needs. The scope and scenario coverage is really awesome. Below are the tools that are present/ integrated in Azure Migrate which can be used for migration based on your scenario –


Below are the workload types supported by the Azure Migrate –
       1.    Servers – Virtualized, physical, other clouds to Azure
2.      Databases – almost all, Refer below screenshot in related questions below
3.      Data – Migrate to Hot, Cool and Archive tier of Azure Storage using Databox, Import/ Export
4.      Web applications – Migrate to Azure App Service
5.      Virtual Desktops – VDI migrations to Windows Virtual Desktop


I am not going to explain “what is Azure migrate?” We directly dive into questions in next section. As of today I have curated list of around 23+ questions based on experience which are other than official FAQ document

If you have any question that is still not answered, use “Contact Me” and I shall get answer for you related to Azure Migration. That’s a promise!

Sunday, September 29, 2019

Azure VMs – Export to CSV

Abstract

For human race, there are some common tasks in daily life which you must do. Without which humans can survive but you can’t say if they are “living the life”. For example, taking a bath is one of such tasks. You can survive without taking a bath but you will not like it. These tasks are those which bring “life” to humans daily lives and make them enjoy their stay on earth.

Out of these humans there is special category of humans – I call them “Humans who work in Software field”. They can be sub-categorized into below –

       1.     Software developers
2.      IT administrators
3.      Project managers
4.      Software Engineers
5.      Solution Architects

For all these sub-categories you can apply prefix such as Senior, Junior, Principal, Full Stack, Distinguished and in recent times we have a new addition to this prefix known as “CLOUD”. These are humans who can easily survive without bath but there is one thing without which none of these humans can survive and it is known as “Export to CSV”. It is more or equally important like eating food and drinking water for them.

No matter how many cutting edge features and service Microsoft Azure is bringing, we still feel the product or service is not complete unless you offer “the” functionality of “Export to CSV”. Surprisingly Azure VM export to csv do not exists on Azure portal and you need to write a PowerShell for this. Therefore my lazy followers and friends asked me to write PowerShell to export Azure VM to CSV. So here we are!

Let’s go!

Current state of feedback

Users have provided the feedback to bring the functionality of export to csv for all azure resources on the portal. It is on the roadmap. You can view the details here - https://feedback.azure.com/forums/216843-virtual-machines/suggestions/37934101-virtual-machine-list-export-to-csv.

Why yet another new script?


I spoke to multiple people who are dealing with Azure VMs daily basis and requirements from there for CSV was an eye opener. Many of the scripts available today provides very minimal details about VM when exported to CSV. Most of the Azure Administrator find them not so useful. So after a quick survey with few of Lazy followers I received below list as a top ask for Azure VM to CSV export. In the below list the top ask was to retrieve Azure VNET for Azure VM and Azure VNET subnet for Azure VM using PowerShell. I have addressed this as well in the script.

So, current script provides the CSV output of Azure VMs with great details. Refer below columns list –