Showing posts with label Powershell. Show all posts

Sunday, April 25, 2021

How to Restrict Azure Firewall Access from Contributor, Owner Role?

 7 min to read.

Abstract

When I look at Azure Built In Role Documentation I always feel this is really big list of built in roles and hardly any Organization will require to create new Azure custom role.

However when you work with Azure Customers, your faith and beliefs are bound to fail. And if your customer is Bank, your concepts of Security will fail.

So my customer started big on Azure Firewall. It was maintained by their network administrators team. One fine day network admin discovered that the Azure Firewall is visible to all users with Contributor and Owner access.

Obviously the demand came that Owner/ Contributor should have full access EXCEPT Azure Firewall.

Damn Zero Trust!

Anyways, How to hide/ restrict Azure Firewall access from Azure Owner and Contributors? Read on…


Have you heard of Azure custom roles?

The solution is simple. We need Custom Owner and Contributor role that will have default access levels except for Azure Firewall.

Azure Built in Roles list is here - https://docs.microsoft.com/en-us/azure/role-based-access-control/built-in-roles.

If the Azure Built In Roles don’t meet the specific needs of your organization, you can create your own custom roles.

So we will need to build custom Owner and Contributor role that do not have access to Azure Firewall.

Always get Built in Role Definition first!

For simplicity I am going to build custom Contributor Role only. Same can be replicated for Owner Role too.

First let us grab the built in role definition of Contributor Role using Azure PowerShell.

If you do not have Azure PowerShell get it installed or use it from Azure Shell. I want to edit the role definition on my local laptop so I am using Azure PowerShell from my local machine.

First login to correct Azure Subscription and Azure AD. I have seen major bomb blasts due to wrong selection of Subscription and Azure AD Tenant.

Connect-AzAccount -Subscription YourSubscriptionID  -Tenant YourAzureADTenantName-Like-Something.onmicrosoft.com

Get Contributor Role definition in JSON format with below command –

Get-AzRoleDefinition -Name "Contributor" | ConvertTo-Json | Out-File "YourPath\Contributor.Json"


Make sure that correct Path is selected as per your choice in above command. The Contributor role definition JSON will be created at specified location and it looks similar to below screenshot. Open JSON in Visual Studio Code. [click to get better view].


Modify the Contributor Role to Restrict Azure Firewall access!

I copy pasted above Contributor Role JSON to another document in VS Code changed the name of file..

The name of the role I changed to “Contoso-Contributor.json”.

Now take quick steps as mentioned below –

1.      Remove the Id filed completely. When you create role in Azure PowerShell; ID filed automatically gets created for you.

2.      As this is going to be customer Azure Role; change “IsCustom” property to True.

3.      Change the description that suits to your needs. I changed it to – Contoso Contributor Grants full access to manage all resources, but does not allow you to assign roles in Azure RBAC, manage assignments in Azure Blueprints, or share image galleries. However  users with this role can't access Azure Firewall.

4.      To remove the firewall access we need to add below line in NotActions segment of JSON as below – Microsoft.Network/azurefirewalls/*"

When we added * above, this means all types of actions are removed / restricted for Azure Firewall Resources. Make sure that you add “comma” on second last line.

5.      Make sure you add the desired subscription at the bottom in “AssignableScopes” property. Unless subscription Id added the role will not be created. The format of subscription has to be as follows -

Refer to screenshot below – [click to get better view].


Create the Role Definition in Azure Subscription

Now run below PowerShell command to get the role created. Make sure you use the Path of your choice where Contoso contributor json definition is present.

New-AzRoleDefinition -InputFile "YourPath\Contoso-Contributor-NoFirewallAccess.json"


The output of the command will be shown as below – [click to get better view]


Assign the role to user

I have created a user named as Contoso User in My Azure AD as shown below – [Click to get better view]


Then go to Azure Subscription -> Subscription -> Select Subscription [which is used in AssignableScope] -> Access Control -> Add -> Role Assignment. Selected Contoso User and assigned custom contributor role – [click to get better view]


Verify Azure Firewall Access

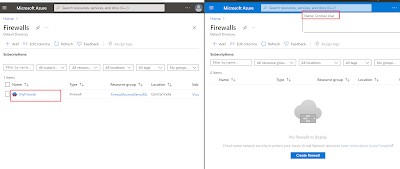
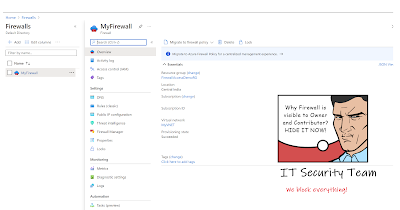
So, I selected two users – One with Contributor role and other with Contoso-Contributor Role. When click on Azure Firewall; I can clearly see that even If the Contoso User has all the access same as normal Contributor; the Azure Firewall Resource is not visible – [click to get better view].


Conclusion

Hope this article helped to Custom Contributor role to restrict / hide Azure Firewall.

Happy access control!!

A humble request!

Internet is creating a lot of digital garbage. If you feel this a quality blog and someone will definitely get benefited, don't hesitate to hit share button present below. Your one share will save many precious hours of a developer. Thank you.

Next Related Posts

4VNETs and transitive Routing using Azure firewall

Azure Virtual Machines – real world frequently asked questions – not easily answered.

Azure Migration frequently asked questions, not easily answered!

Azure VM disk encryption, what should be my approach!
Bypass onpremises firewall to RDP or SSH into Azure VM

Sunday, September 29, 2019

Azure VMs – Export to CSV

Abstract

For human race, there are some common tasks in daily life which you must do. Without which humans can survive but you can’t say if they are “living the life”. For example, taking a bath is one of such tasks. You can survive without taking a bath but you will not like it. These tasks are those which bring “life” to humans daily lives and make them enjoy their stay on earth.

Out of these humans there is special category of humans – I call them “Humans who work in Software field”. They can be sub-categorized into below –

       1.     Software developers
2.      IT administrators
3.      Project managers
4.      Software Engineers
5.      Solution Architects

For all these sub-categories you can apply prefix such as Senior, Junior, Principal, Full Stack, Distinguished and in recent times we have a new addition to this prefix known as “CLOUD”. These are humans who can easily survive without bath but there is one thing without which none of these humans can survive and it is known as “Export to CSV”. It is more or equally important like eating food and drinking water for them.

No matter how many cutting edge features and service Microsoft Azure is bringing, we still feel the product or service is not complete unless you offer “the” functionality of “Export to CSV”. Surprisingly Azure VM export to csv do not exists on Azure portal and you need to write a PowerShell for this. Therefore my lazy followers and friends asked me to write PowerShell to export Azure VM to CSV. So here we are!

Let’s go!

Current state of feedback

Users have provided the feedback to bring the functionality of export to csv for all azure resources on the portal. It is on the roadmap. You can view the details here - https://feedback.azure.com/forums/216843-virtual-machines/suggestions/37934101-virtual-machine-list-export-to-csv.

Why yet another new script?


I spoke to multiple people who are dealing with Azure VMs daily basis and requirements from there for CSV was an eye opener. Many of the scripts available today provides very minimal details about VM when exported to CSV. Most of the Azure Administrator find them not so useful. So after a quick survey with few of Lazy followers I received below list as a top ask for Azure VM to CSV export. In the below list the top ask was to retrieve Azure VNET for Azure VM and Azure VNET subnet for Azure VM using PowerShell. I have addressed this as well in the script.

So, current script provides the CSV output of Azure VMs with great details. Refer below columns list –

Wednesday, July 10, 2019

Delete Azure File Storage Directory and files using PowerShell and secret sauce of recursion


Abstract


Come on guys!! Seriously?

After this successful post of Azure Virtual Machine – Frequently asked questions – not easily answered I got almost 54+ requests/ comments/ emails asking specifically for a blog post on sharing script for “Deleting Azure File Storage Directory using PowerShell”.

Not sure why people felt this is hard to write a PowerShell script. Well, this post is about the same topic and at the end of post you will know how to delete Azure file storage Directory and Files using PowerShell scripting.
You must have read the word in title “Secret sauce of Recursion”; about that later in the post below.

Lets go!

What is big deal in deleting Azure File Storage Directory and Files?


Well, you may think this as straight forward PowerShell. I also thought the same way until I actually tried for it.
As a best practice, before trying anything from PowerShell I always do the same task using Azure Portal. So for deleting Azure Files I went on to the portal. Created a storage account of type v2; and then created a File storage of 10GB as shown in the screenshot below. At this point the file share is empty.


Note – Focus on Blue box and blue underline; I wrote this blog at 2AM in the night. This is how I am getting attached to my blog after my wife.

Then I created a directory and uploaded few files within directory and few files directly in share and few directories inside the root directory and then again few files.

Note - If you have not understood above sentence; then blame 2AM time.

So my directory structure looks as below on Azure File storage share –


Yellow boxes are directories, blue boxes are files and green box is the actual file share inside which all of this is present. I tried to delete the directory wwwroot from the portal UI and I got below message.


This means I will have to delete each and every file present in the directory of my file share. If there is cascading of directories [directory within directory] then each of the directory will have to be made empty first and then delete each of the directory one by one and then the actual directory I want to delete.

This is big deal task and no wonder people are finding it difficult in PowerShell. As of now there is no single command by which you can delete directory including everything within it. So if I want to retain my file share but delete everything within it; I must empty all the directories.

What is my way out?


Well, you need to traverse through each of the directory and make it empty. So you might be thinking for for-each loop in PowerShell to do it. You are correct. But only for-each or for loop will not help you win the war. You need super power called as “RECURSION”. Write a recursive function in PowerShell and we should be able to win the war.

Why people find it difficult to write RECURSIVE functions?


People of my generation [people who started career between 2006 to 1012 year]who had started their programming career in C, C++, micro-controller programming will never find recursion difficult. Because the very first program we had build was Factorial number and it is product of all integers from 1 to n. For example factorial of 5 is 5 x 4 x 3 x 2 x 1  = 120.

This classic problem can be solved by recursion effectively.

Recursion is basic programming technique you can use in many languages including PowerShell, in which a function/ method calls itself to solve some problem. A method/ function that uses this technique is called as “Recursive function”. There are many problems that can be solved only by recursion.

To empty azure file directories we need recursion in PowerShell.

I have seen most of the new comers who starting their career in IT fields directly jump to Artificial Intelligence and Machine learning programming. More of less basics of programming may get missed like data structures, recursions etc.. I asked the year of experience to many people who demanded to write this PowerShell to delete Azure files directories and files and no surprise most of them were in the range of 4 to 6 years of experience.

Anyways no hard feelings!

Let us build PowerShell to delete Azure file storage directories and files recursively.

Define variable and create Azure Storage context


I am using latest Azure PowerShell module.

We need to define the variables for storage account details and then create the context for storage account. Context is an important steps as for every operation you perform against any of the service in Azure storage context should be passed in PowerShell commands.

#define varibales
$StorageAccountName = "YourStorageAccountName"
$StorageAccountKey = "YourStorageAccountPrimaryKey"
$AzShare = "kunalshare – you write your file share name here"
$AzDirectory = "LatestPublish"


#create primary region storage context
$ctx = New-AzStorageContext -StorageAccountName $StorageAccountName -StorageAccountKey $StorageAccountKey
$ctx.ToString()

#Check for Share Existence
$S = Get-AzStorageShare -Context $ctx -ErrorAction SilentlyContinue|Where-Object {$_.Name -eq $AzShare}

Get the directory name and call for delete function


Now as per the directory hierarchy in above diagram; you can see that inside File Share I have a root directory called as “LatestPublish” and all other files/ directories are present inside it.
So I want to delete “LatestPublish” folder. So let us retrieve the reference for the folder and then call delete recursive function.

# Check for directory
$d = Get-AzStorageFile -Share $S -ErrorAction SilentlyContinue|select Name

if ($d.Name -notcontains $AzDirectory)
{
    # directory is not presetn; no action to be performed
   
}
else
{
    $dir = Get-AzStorageFile -Share $s -Path $AzDirectory   
    RemoveFileDir $dir $ctx #Calling function to remove directory.
}

Recursive function to remove directories


In above code of getting root directory we are calling a function named as RemoveFileDir. Let us write this function.

function RemoveFileDir ([Microsoft.Azure.Storage.File.CloudFileDirectory] $dir, [Microsoft.Azure.Commands.Common.Authentication.Abstractions.IStorageContext] $ctx)
{  
    $filelist = Get-AzStorageFile -Directory $dir
   
    foreach ($f in $filelist)
    {
       
        if ($f.GetType().Name -eq "CloudFileDirectory")
        {
            RemoveFileDir $f $ctx #Calling the same function again. This is recursion.

        }
        else
        {
            Remove-AzStorageFile -File $f           
        }
    }
    Remove-AzStorageDirectory -Directory $dir
   
}


In above function, we are receiving the root directory object to be deleted and storage context as parameter. Then we use for loop to traverse through the received directory object and see if there any more directories. If there is a directory found then we call the same function in recursion mode; until we reaches to last directory/ file present in the hierarchy. Once we reach to last item then we delete it.

Download entire source code

Download the entire source code of deleting Azure file directories from GitHub https://github.com/kunalchandratre1/DeleteAzureFilesDirectoriesPowerShell

Bonus tip

If you delete file share from the azure portal; everything within that gets deleted automatically and you don’t have to indulge yourself in to PowerShell. However if you want to delete selected directories and files from File share then PowerShell is the only way or do it manually from portal.


Conclusion

Hope this blog helped you t get working Azure PowerShell script for deleting Azure file storage directory and files recursively. Please feel free to add/ update your comments. Thanks.


Happy recursion!! 

A humble request!

Internet is creating a lot of digital garbage. If you feel this a quality blog and someone will definitely get benefitted, don't hesitate to hit share button present below. Your one share will save many precious hours of a developer. Thank you.

Tuesday, July 11, 2017

Start Stop Multiple Azure VMs on schedule using Azure Automation

Abstract

I searched through many, many, many…articles written about Azure VM stop(de-allocate) to save cost. Every article only targets single Azure VM to shutdown (de-allocate). None of the articles target start and Shutdown of multiple Azure VMs using automation. I am going to address this using Azure powershell in this article.

What all Cool features of azure VM start/ stop my script offers?

If you have multiple Azure VMs present in your azure subscription; and you want to start or stop few of them on schedule then you can use below azure PowerShell scripts. It will have below features –
è  Add/ remove the VM names from the list of start/ stop schedule easily. [You don’t need to have PowerShell knowledge]
è  Use same script in multiple different Azure runbooks, with different Azure VM names to start and stop; that too with different schedules.
è  In case any wrong/ nonexistent VM name added to the list, script takes care of giving relative user-friendly message and do not throw error. It continues with other remaining set of Azure VMs and perform start or stop.
è  Can be used with single VM as well if required.
è  You start and stop azure VMs based on schedule hence obviously you optimize or save Azure cost.
è  Script is available for download; hence you can own it to change in future. [that’s cool 😊]
I can say all above feature are nothing but the “Key differentiator” or “Value Proposition” from other Azure VM shut down/ start automation blogs/ scripts. [These marketing terms; I hear them a lot 😊]

Fundamentals of Azure VM cost optimization

Azure VM are made of Compute and Storage. Compute is nothing but Core (number of cores/ CPUs) and RAM you get when you provision Azure VM. Storage is nothing but the C drive or other letter drives; except D drive for windows and Sdb drive for Linux]. These drives are nothing but disks or .vhd files present in Azure storage account [if VM is unmanaged] else disks or .vhd files will be part of your subscription [if VM is created using managed disks].
When we say you stop Azure VM from portal or using PowerShell command “Stop-AzureRMVm” basically Compute part of VM is released (or de-allocated). It is worth to mention here that “STORAGE PART REMAINS”.
So, when you think that if VM is in de-allocated state then I am not charged, YOU ARE WRONG. You are not charged for compute/Cores part; for storage capacity you are charged. However that is too cheap, so don’t worry. Cores are costly and that is where you save cost.
Also if you shutdown Azure VM after taking RDP/ SSH, compute is not released so you are charged for compute and storage both in that case. Therefore, it is recommended that you stop azure vm either using portal or PowerShell command. Refer the FAQ section from link for more details.
Let’s go back to script part now.

Stop multiple Azure VMs script


#define the VM names which are required to be shutdown
$vmNamesToBeShutDown = "vm1", "vm2", "vm3"

foreach($vmName in $vmNamesToBeShutDown)
{
    $resource = Find-AzureRmResource -ResourceNameEquals $vmName -ResourceType "Microsoft.Compute/virtualMachines"
    if($resource -ne $null)
    {  
        Write-Output "Stopping virtual machine..." + $vmName
        Stop-AzureRmVM -ResourceGroupName $resource.ResourceGroupName -Name $vmName -Force
    }   
    else
    {
        Write-output "Virtual machine not found:" + $vmName
    }
}

The variable $vmNamesToBeShutDown is very important. This is where you can add as many VMs as you want to de-allocate them. The only requirement is to add VM name in double quotes and comma separated.
The code then traverse through each of the VM names, checks its existence and if found then fires command to de-allocate the azure vm.

Start multiple Azure VMs script

#define the VM names which are required to be shutdown
$vmNamesToBeStarted = "vm1","vm2", "vm3", "vm4"

foreach($vmName in $vmNamesToBeStarted)
{
    $resource = Find-AzureRmResource -ResourceNameEquals $vmName -ResourceType "Microsoft.Compute/virtualMachines"
    if($resource -ne $null)
    {  
        Write-Output "Starting virtual machine..." + $vmName
        Start-AzureRmVM -ResourceGroupName $resource.ResourceGroupName -Name $vmName
    }   
    else
    {
        Write-output "Virtual machine not found:" + $vmName
    }
}

The structure of the start Azure VM script is same as that of Stop except the command used here to start VM is Start-AzureRmVM.
Here also you will only add VM names comma separated and they will get automatically started once you schedule script running.

Automate and schedule the start/stop Azure VM scripts

Azure automation allows you to create PowerShell script based runbook which can run automatically on pre-defined schedule.
The guidance here is copy paste above scripts in a runbook in PowerShell. When you plan to run the PowerShell as runbook make sure that you are using service principal authentication code at the start of runbook as depicted in this link – http://sanganakauthority.blogspot.in/2017/05/run-login-azurermaccount-to-login.html. The authentication code should be added before any other PowerShell code in runbook. After creating runbook, publish it. Without publish runbook will not execute.
Then create schedule in automation account as per desired schedule. Screenshot below –


Once schedule is created, attach to runbook as below –


Similarly you can create as many as runbook and schedule them at your will and it should work.
Hope this helps.

Happy automating!!


You may be interested in – 

Domain join Azure virtual machine automatically using Azure Automation and DSC - http://sanganakauthority.blogspot.in/2017/01/domain-join-azure-vm-using-azure.html