8 min to read.
Abstract
Azure Open AI adoption for application
innovation is in full speed. With the same speed security teams are analyzing
and doing VAPT on Azure Open AI endpoints. Recently a customer’s security team
gave big list of 30+ vulnerabilities for their Azure Open AI endpoint.
So obvious question from application team
“what can we do for security of Azure Open AI?”
This article step by step guide is for using
Azure Front Door Web Application Firewall (WAF) with Azure Open AI.
The Challenge
In my opinion performing VAPT on direct open
AI endpoint and calling it unsecure is incorrect approach. If an application
team develops and host APIs on say Azure App Service/ AKS/ ARO/ Container Apps;
it will also have similar vulnerabilities. Because these are plain APIs and not
security appliances. We need to use Security appliances in front of APIs to
secure them.
This is similar type of scenario when you
create Azure Open AI service in your Azure subscription. Therefore we need to
address below security aspects for Azure Open AI endpoint –
1. OWASP
common vulnerabilities protection
2. Azure
Open AI endpoint should not be hit directly from end client applications like
web app/ mobile app.
3. If
possible, remove public access to Open AI endpoint completely.
Solution
The standard approach to protect Azure Open
AI APIs will be to use Web Application Firewall (WAF).
WAF on Azure Native technology offering is
either Application Gateway or Azure Front Door. I will use Azure Front Door in
this article.
Lets start.
Create Azure Open AI Service
Please don’t ask “how do I get access to
Open AI in my Azure subscription?”. It is not in my control and I can’t even
influence it. Follow the general procedure mentioned here.
Once you have access to Azure Open AI follow
the below procedure to create it.
How-to:Create and deploy an Azure OpenAI Service resource - Azure OpenAI | MicrosoftLearn
From this link make sure that you choose
“option 1: Allow all networks”. Don’t follow “specific networks only” and
“disable network access” scenario for now.
Now Azure Open AI service instance is
created. Next step will be to create deployment. Click on “Create New
Deployment -> Add details as shown with model selected as gpt-35-turbo.
Click on Create to complete model deployment.
Once model is created, select it and click
on “Open in Playground”. Then click on “View Code” under “Chat Session”
section. A pop up will appear showing Azure Open AI endpoint, and an access key
as shown below –
Lets try Azure Open AI endpoint in Postman
and get the output. To run in postman I used below details –
Body added in postman is as follows –
{
"messages": [
{
"role": "system",
"content": "You are an AI assistant that helps people find information."
},
{
"role": "user",
"content": "What is Azure OpenAI?"
}
]
}
Rest of the setting with header in Postman
as below. As you can see the outcome is 200 successful response.
Here we have used Azure Open AI endpoint
directly in postman. As a next step lets create Azure Front Door and configure
Azure Open AI as a backend to Azure Front Door.
Create Azure Front Door Service
On Azure portal click on Create -> In
Search box type FrontDoor and Select FrontDoor Service creation option. Then on
offerings page select options “Azure Front Door” and “Custom Create” as shown
below – [click on image to get better view].
On Profile page under Basic tab select tier
as “premium” and Resource group, service name as per your choice. Refer details
as below. I could have chosen Standard tier however later in the future I am
going to show AFD + Azure OpenAI with private endpoint which will be supported
in Premium tier of AFD. [click on image to get better view].
Keep Secrets tab empty for now. On
“Endpoint” tab click on “ Add an endpoint” button. Provide name as you wish. The
click on Add. Refer to below screenshot – [click on image to get better view].
Then click on “Add a route” option in
“Endpoint” tab. Add name as “myRoute”. Then click on “Add a new Origin Group”.
Name it as “myOriginGroup”. Then click on “Add a Origin” button as shown below
–
On the add Origin screen, I selected origin
type as “custom” as Azure OpenAI does not appear inside the Azure front door
origin types list. As of now I have not enabled the private endpoint for Azure
Open AI. Refer to the screenshot below for rest of the inputs. Then click on
“add” to finalize on Origin creation.
You will be redirected back to Origin group screen. Here the screen asks about enabling health probe. In Azure Front Door Health Probes can’t work with Authentication, however Azure Open AI endpoint API need API Key header for authentication. Also my intent is to show how we can WAF protection for Open AI. There are other ways by which you can check Azure Open AI endpoint health status. Therefore here I will disable the Health Probe. Click on Add button to finish Origin group creation.
This will bring back to add route screen.
Keep Origin Path blank, Forwarding protocol to “match incoming requests”,
Caching option is unchecked. Then click on add to finish route adding.
On the same page click on “Add Policy”
button. Provide the name as “myPolicy”, select Azure OpenAI domain listed under
“Domains” dropdown. Under WAF Policy option, click on Create New and name it as
MyWAFPolicy. Check the option “add bot protection”. Finally click on Save to
complete WAF policy creation.
Then click on “review and Create” button to
finish Azure front door service creation process.
Output
Now we have Azure Front Door WAF ready with
Azure Open AI endpoint as backend. Lets try to access Open AI endpoint using
Azure Front Door URL via Postman.
My original Azure Open AI Endpoint is - https://kunalgenai.openai.azure.com/openai/deployments/kunaldeploy1/chat/completions?api-version=2023-03-15-preview
With Azure Front Door it will be - https://kunalopenaiafdep-hgc2ecbybxeranac.z01.azurefd.net/openai/deployments/kunaldeploy1/chat/completions?api-version=2023-03-15-preview
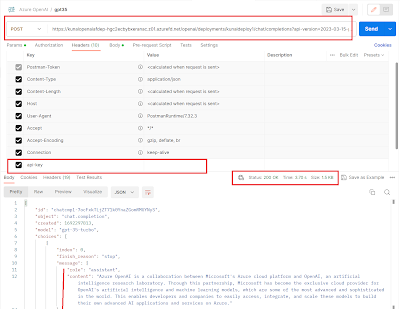
Try the Azure Front Door URL in postman,
with same body, same headers, same api key and I see that result is successful.
Refer below screenshot –
I have not tested with Azure Open AI with
private endpoint. Please test it and add your experience in comments.
Conclusion
Hope this article helped you to secure Azure
Open AI endpoint using Azure Front Door (AFD) (WAF).
Happy Generative AI..ing!!
A humble request!
Internet is creating a lot of digital
garbage. If you feel this a quality blog and someone will definitely get
benefited, don't hesitate to hit share button present below. Your one share
will save many precious hours of a developer. Thank you.
Next Related Posts
AzureVirtual Machines should be connected to allowed multiple virtual networks.
Start
stop multiple Azure VMs on schedule and save cost!
Azure
Migration frequently asked questions, not easily answered!


