Abstract
For human race, there are some common tasks in daily
life which you must do. Without which humans can survive but you can’t say if they
are “living the life”. For example, taking a bath is one of such tasks. You can
survive without taking a bath but you will not like it. These tasks are those
which bring “life” to humans daily lives and make them enjoy their stay on earth.
Out of these humans there is special category of humans –
I call them “Humans who work in Software field”. They can be sub-categorized into
below –
1. Software
developers
2. IT administrators
3. Project managers
4. Software Engineers
5. Solution Architects
2. IT administrators
3. Project managers
4. Software Engineers
5. Solution Architects
For all these sub-categories you can apply prefix such
as Senior, Junior, Principal, Full Stack, Distinguished and in recent times we
have a new addition to this prefix known as “CLOUD”. These are humans who can
easily survive without bath but there is one thing without which none of these
humans can survive and it is known as “Export to CSV”. It is more or equally
important like eating food and drinking water for them.
No matter how many cutting edge features and service
Microsoft Azure is bringing, we still feel the product or service is not
complete unless you offer “the” functionality of “Export to CSV”. Surprisingly
Azure VM export to csv do not exists on Azure portal and you need to write a PowerShell
for this. Therefore my lazy followers and friends asked me to write PowerShell
to export Azure VM to CSV. So here we are!
Let’s go!
Current state of feedback
Users have provided the feedback to bring the
functionality of export to csv for all azure resources on the portal. It is on the
roadmap. You can view the details here - https://feedback.azure.com/forums/216843-virtual-machines/suggestions/37934101-virtual-machine-list-export-to-csv.
Why yet another new script?
I spoke to multiple people who are dealing with Azure
VMs daily basis and requirements from there for CSV was an eye opener. Many of
the scripts available today provides very minimal details about VM when exported
to CSV. Most of the Azure Administrator find them not so useful. So after a
quick survey with few of Lazy followers I received below list as a top ask for
Azure VM to CSV export. In the below list the top ask was to retrieve Azure
VNET for Azure VM and Azure VNET subnet for Azure VM using PowerShell. I have
addressed this as well in the script.
So, current script provides the CSV output of Azure VMs
with great details. Refer below columns list –
1. Subscription
Id
2. VM Name shown on the portal
3. Resource group name
4. Location
5. VM Size
6. Status of the VM
7. Availability sets name [if present]
8. Private IP assigned to primary NIC
9. Public IP assigned to primary NIC
10. OS type
11. Primary NIC Name
12. NSG name attached to Primary NIC
13. VNET and Subnet name to which Azure VM belongs
So these are the “best 13” properties/ information from
the Azure VM which everyone wants to have.
Get Tenant ID of Your Azure AD
Any Azure subscription always belong to an Azure AD. Any
access control to Azure Subscription is controlled through Azure AD only. So
when we need to login to Azure PowerShell for exporting Azure VMs list to CSV
we need to specify the tenant id of Azure AD. You can record the Azure AD
tenant id as shown in the portal below through Azure AD -> Properties.

Post this, to run the script install Azure PowerShell
modules on your machine by following this link – here.
If you have it already installed then you may skip it.
Provide Subscription ID and Tenant ID as input
Refer to below script. At this point either you can
provide the subscription Id and if missing then script will prompt you for the
subscription Id and Azure Ad tenant ID.

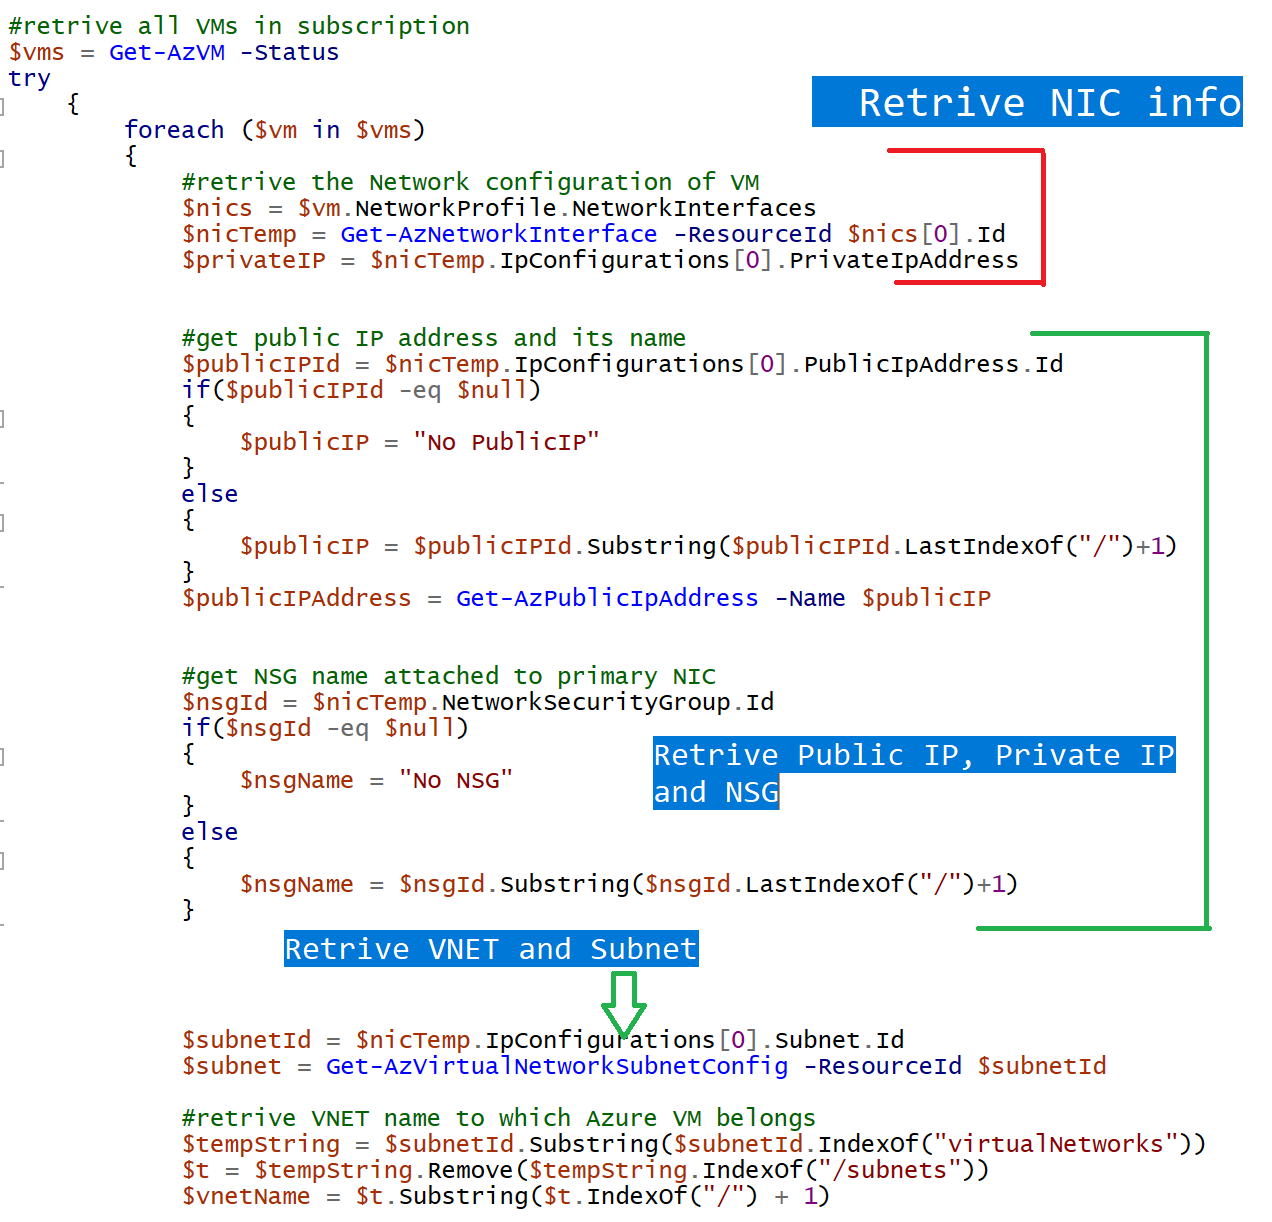
Get All Azure VMs and iterate to get best 13 properties
In this step we retrieve all azure VMs and iterate
through each of the VM properties to get the above said Azure VM properties.
Believe it was not easy! Glimpse of them is below!
Then I create array of all the properties and exported
to CSV as shown below –

Bonus Tip
In the script I have commented an important line as
below –
#Write-host "Disconnecting already cached accounts."
#Disconnect-AzAccount
If you are not getting correct Azure AD tenant and not
able to find correct Azure subscriptions after login through PowerShell;
uncomments it and then run the script. This command specifically removes all
cached logins and make PowerShell kind of reset with Azure Logins. This should solve
the problem, if you happen to face.
Also if you observe the script carefully, you can view
how I used String functions of PowerShell to identify the VNET name of the
azure VM. If you have programming eye, then you can use the same method to retrieve
the “resource group” name of VNET in which the Azure VM is present.
Conclusion
And that’s it! Hope this article has given you how it is
difficult to export Azure VMs details to CSV. Hope this PowerShell script has
made your life simple.
Download the complete PowerShell code for exporting
Azure VM to CSV from here –
Happy Exporting!!
Thanks a lot for your script, it's a big help. Couple of questions for you:
ReplyDelete1. Where in script I make the change so the report comes out with my preferred column order. I prefer the "VM Name" column on first.
2. How do I add "tagname' and "tagvalue" to the output?
Thanks a lot again!
Change the order of columns above as shown in the screenshot above Bonus Tip. Similarly add new columns in the script above which you want in output.
DeleteCan you give an example of how to add tags as an item in the script?
ReplyDeleteHi i get an error A parameter cannot be found that matches parameter name 'ResourceId'
ReplyDeleteWhat edits do I need for adding below?
ReplyDelete"VM OS Disk Size" = $_.StorageProfile.OsDisk.DiskSizeGB
"VM Data Disk Size" = ($_.StorageProfile.DataDisks.DiskSizeGB) ';'
Just as these properties in $vmInfo section
Deletehow to add tags to the csv output?
ReplyDeleteI ran the PS script and the csv camme back blank. Also got the error:
ReplyDeleteA parameter cannot be found that matches parameter name 'ResourceId'
Hi, I was trying to follow your script but got this error. Just wondering if you could give me some help. Thanks
ReplyDeleteCannot index into a null array.
Get-AzNetworkInterface: